


As I've been dipping my feet into the vast ocean that is AWS' CDK, I've appreciated the reusable and easily customizable, modular code. Through all the hours of troubleshooting error codes and "Aha!" moments that never arrived early enough, the product I am left with is code that I can easily implement into my future projects, leading to an accelerated development process. You can check out my Github repo and hopefully, it'll spare you several hours of stress.
Vocabulary
Stack- The unit of deployment in the AWS CDK is called a stack. All AWS resources defined within the scope of a stack, either directly or indirectly, are provisioned as a single unit.Stage- a stage is a modeling unit or construct that consists of multiple stacks deployed together.Lambda- a serverless compute service that runs your code in response to events and automatically manages the underlying compute resources for you.API Gateway- service for creating, publishing, maintaining, monitoring, and securing REST, HTTP, and WebSocket APIs at any scale.
Downloads
Download Typescript and AWS CDK.
npm i -g typescript aws-cdk
Prerequisites
To create a GitHub-sourced pipeline for your project, you will need:
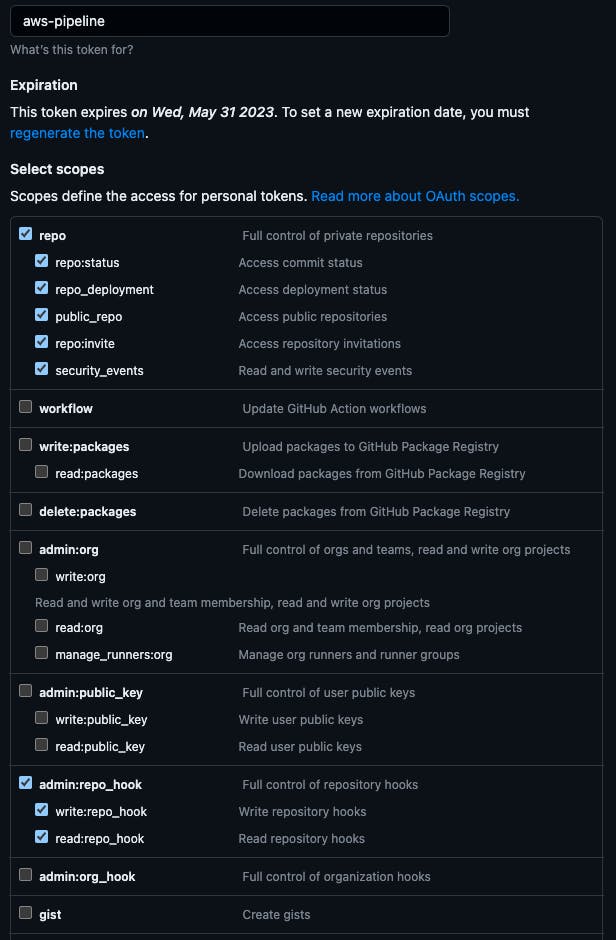
A Github account with a personal access token.
Settings
Developer Settings
Personal Access Tokens
Tokens (classic)
Generate new token (classic)
Assign full control of repo and repo hooks.
Once you created your key, copy that token and navigate to Secrets Manager on your AWS Console.
Store a new Secret
Secret Type = Other type of Secret
Enter
"github-token": "paste-token-here"as the key-value pairSecret name =
github-tokenStore
AWS Account with AdministratorAccess
Navigate to Control Tower in your AWS console. Make sure you aren't logged into your root account as it will not be possible to create an account.
Create your admin account. This will be the account that you will need to implement into your pipeline stack.
Create two email accounts for your Log Archive and Audit accounts. (Takes 5 minutes on Gmail).
Set up Landing Zone.
Once the landing zone is finished setting up (~1 hour), navigate to users and access and click on the user portal URL. Save this URL for later. You will need to retrieve the aws_session_token but if you retrieve it too early it will expire considering it's just a short-term credential.
Initialize project
For this application, we'll just be deploying a simple application with a Lambda that returns a fixed response and an API Gateway that allows you to access it from the internet.
Create your Github repository named "cdkpipelines-demo" and clone it to your local machine.
cd cdkpipelines-demo
// Initialize cdk app
npx cdk init --language=typescript

// Install dependencies for the CDK application
npm install @aws-cdk/aws-apigateway @aws-cdk/aws-lambda \ @types/aws-lambda

// Install CDK pipelines
npm install @aws-cdk/pipelines
Copy this code and paste it over the lib/cdkpipelines-demo-stack.ts .
import * as apigw from '@aws-cdk/aws-apigateway';
import * as lambda from '@aws-cdk/aws-lambda';
import { CfnOutput, Construct, Stack, StackProps } from '@aws-cdk/core';
import * as path from 'path';

/* Stack for our Lambda */
export class CdkpipelinesDemoStack extends Stack {
  /**
   * The URL of the API Gateway endpoint, for use in the integ tests
   */
  public readonly urlOutput: CfnOutput;

  constructor(scope: Construct, id: string, props?: StackProps) {
    super(scope, id, props);

// Lambda
    const handler = new lambda.Function(this, 'Lambda', {
      runtime: lambda.Runtime.NODEJS_12_X,
      handler: 'handler.handler',
      code: lambda.Code.fromAsset(path.resolve(__dirname, 'lambda')),
    });

    // An API Gateway to make the Lambda web-accessible
    const gw = new apigw.LambdaRestApi(this, 'Gateway', {
      description: 'Endpoint for a simple Lambda-powered web service',
      handler,
    });

    this.urlOutput = new CfnOutput(this, 'Url', {
      value: gw.url,
    });
  }
}
Create a new folder named lambda in the lib folder and a file named handler.ts in it. The file path should be lib/lambda/handler.ts. Paste the following code.
import { APIGatewayProxyEvent, APIGatewayProxyResult, Context } from 'aws-lambda';

export async function handler(event: APIGatewayProxyEvent, context: Context): Promise<APIGatewayProxyResult> {
  return {
    body: 'Hello from a Lambda Function',
    statusCode: 200,
  };
}
Defining an Empty Pipeline
Now we are going to be creating a Stage which takes copies of the application and places them in different environments for development and testing. This would be especially useful for large-scale projects where we would need to design environment configurations for each stage of the project, but thankfully in our use case, the stage consists of only one stack.
Create lib/cdkpipelines-demo-stage.ts and paste the following code:
import { CfnOutput, Construct, Stage, StageProps } from '@aws-cdk/core';
import { CdkpipelinesDemoStack } from './cdkpipelines-demo-stack';

/**
 * Deployable unit of web service app
 */
export class CdkpipelinesDemoStage extends Stage {
  public readonly urlOutput: CfnOutput;

  constructor(scope: Construct, id: string, props?: StageProps) {
    super(scope, id, props);

    const service = new CdkpipelinesDemoStack(this, 'WebService');

    // Expose CdkpipelinesDemoStack's output one level higher
    this.urlOutput = service.urlOutput;
  }
}
Now we will be creating our pipeline stack file, lib/cdkpipelines-demo-pipeline-stack.ts. In this code, make sure you replace the OWNER and REPO values with your information.
import { Construct, SecretValue, Stack, StackProps } from '@aws-cdk/core';
import { CodePipeline, CodePipelineSource, ShellStep } from "@aws-cdk/pipelines";

/**
 * The stack that defines the application pipeline
 */
export class CdkpipelinesDemoPipelineStack extends Stack {
  constructor(scope: Construct, id: string, props?: StackProps) {
    super(scope, id, props);

    const pipeline = new CodePipeline(this, 'Pipeline', {
      // The pipeline name
      pipelineName: 'MyServicePipeline',

       // How it will be built and synthesized
       synth: new ShellStep('Synth', {
         // Where the source can be found
         input: CodePipelineSource.gitHub('OWNER/REPO', 'main', {
            authentication: SecretValue.secretsManager('github-token', {
              jsonField: 'github-token'
            })
         }),
         // Update npm before running commands
         installCommands: ['npm i -g npm@latest'],
         // Install dependencies, build and run cdk synth
         commands: [
           'npm ci',
           'npm run build',
           'npx cdk synth'
         ],
       }),
    });

    // This is where we add the application stages
    // ...
  }
}
When I was at this step of the process and tried bootstrapping and deploying, I would have bootstrapping errors because of an expired access token and deployment errors due to CodeBuilder not being able to run npm ci rendering all the dependencies null or undefined because CodeBuilder ran on an older version of npm. To fix this issue, make sure you add the installCommands option to update npm.
Then open your bin/cdkpipelines-demo.ts file and the following code with your info.
#!/usr/bin/env node
import { App } from '@aws-cdk/core';
import { CdkpipelinesDemoPipelineStack } from '../lib/cdkpipelines-demo-pipeline-stack';

const app = new App();

new CdkpipelinesDemoPipelineStack(app, 'CdkpipelinesDemoPipelineStack', {

  env: { account: 'AccountNumber', region: 'your-region-0' },
});

app.synth();
Finally, add this code in your cdk.json file. There should already be a context object there, you just need to add this one line.
  "context": {
    "@aws-cdk/core:newStyleStackSynthesis": true
  }
Bootstrap
Now that we're done coding, all we need to do is bootstrap the project then deploy! You will only need to bootstrap once per environment that you want to deploy the app. If you're unsure whether the project was bootstrapped, you can always run the command again.
Remember when I told you to hold onto that user portal URL? Now is the time to use it.
Click on the URL
Click on your root account (it should say AWSAdministratorAccess)
Command line or programmatic access
Copy the code in Option 2.
Open your terminal and navigate to ~/.aws open the credentials folder and paste the info. Save.
Navigate back into your cdkpipelines-demo into the root of your project and enter the following command in your terminal.
npx cdk bootstrap \
  --profile NAME-OF-PROFILE \
  --cloudformation-execution-policies arn:aws:iam::aws:policy/AdministratorAccess \
  aws://ACCOUNT-NUMBER/us-east-2
(NAME-OF-PROFILE) is the info within the square brackets at the top of the code that you pasted into your .aws/credentials file. This is the template [ACCOUNT-NUMBER_AWSAdministratorAccess]
Since you added the
"@aws-cdk/core:newStyleStackSynthesis"context key into the cdk.json, the CLI switches to the post 1.46.0 bootstrapping resources which is necessary for CDK Pipelines to work. This new bootstrapping stack creates a bucket and several roles in your account, which the CDK CLI and the CDK Pipeline use to deploy to it.--cloudformation-execution-policiescontrols the permissions that the deployment role has to your account. Before, the CDK CLI had the same permissions as the user running the tool. But since we updated to the newer CLI, the user controls the deployment permissions that the CDK has in the account. You would need to opt-in for the CDK to have full control of your account.
Provisioning the Pipeline
When the pipeline is created, it will run, check out the code from Github, and update itself based on the code that it finds. Therefore, it is vital that you commit and push all the changes you made. After doing so deploy it with the following code:
npx cdk deploy \
  --profile NAME-OF-PROFILE \
  CdkpipelinesDemoPipelineStack
This can take a few minutes to finish, but I spent many minutes staring at the CodeBuilder logs as it goes through the Source, Build, and Update stages making sure no other errors appear.

Congratulations! You now have your pipeline! If there are any questions please feel free to reach out to me through any of my links. Happy Coding!