Storing and Retrieving Images in S3


Intro
As some of you may or may not know, before making this pivot into the web development world, I was a chef at some of the best restaurants in Hawaii. Naturally, I wanted to make a website where chefs far and wide could showcase their signature dishes in the hopes of getting their name out there and gaining clients along the way. But for now, my project’s MVP is a personally curated gallery of dishes from some of Hawaii’s culinary heavyweights. And for that, I need to handle one thing well and efficiently. Image storage.
Here’s my GitHub repo and deployed website if you want to check it out!
Tech Stack
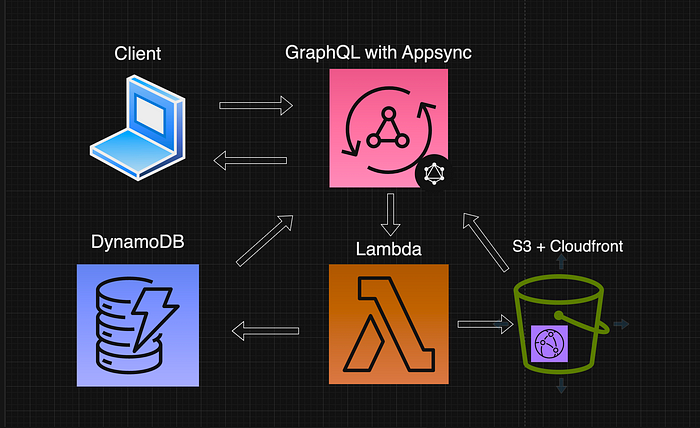
If you tuned into the Stack Overflow Clone series, this tech stack and API flow is similar. S3 and Cloudfront was necessary in that project as well, but this project differs because I need to find an efficient way to store and retrieve images. Having an S3 bucket fronted by Cloudfront is beneficial because it caches files from the bucket in a server near the user, making each subsequent request faster, thus reducing latency.
I looked up possible solutions a few days ago and tried a few methods:
Convert the image into a base64 string and store that in DynamoDB then revert the change when you retrieve it. This method was extremely convoluted don’t even bother trying this one.
Direct upload to S3. I kept encountering “Access Denied” errors when I tried this method or I was able to send the file to S3, but it was an empty file (0B).
I also read articles where they had suggested altering your VTL resolvers and it just seemed way too much work for something as simple as storing images.
After spending hours trying these methods, it made it that much more rewarding when solving this issue with a fraction of the code. Here’s how you do it.
Permissions
First off, you’re going to need to create an IAM Role that has the permissions to read/write from the bucket as well as giving these permissions to authenticated Cognito users. Make sure to record the Access Key and Secret Access Key for your .env file when you initiate the S3 instance. Then, you need to give all users access to read from the bucket.
After you’ve changed these IAM and Bucket policies, you have to enable CORS in the Permissions tab of your S3 bucket. There are a lot of examples online, but you want to enable GET and PUT from all origins just for testing’s sake. You can always restrict it to your domain later on.
Presigned URL
Finally, we got to the meat of the project. The solution that I worked out thankfully was the most efficient way to handle this problem. When we create the Chef entity:
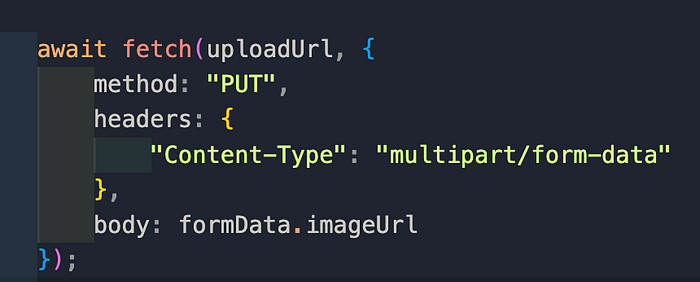
We allow the user to enter their information through a form that has an encType = “multipart/form-data”. This is important because the form consists of multiple text fields, but it also requires us to send a file for the user’s profile image.
Once the form is validated, our Lambda takes the information and generates a presigned URL. This URL allows the user that has it to either GET or POST an object in the S3 bucket.
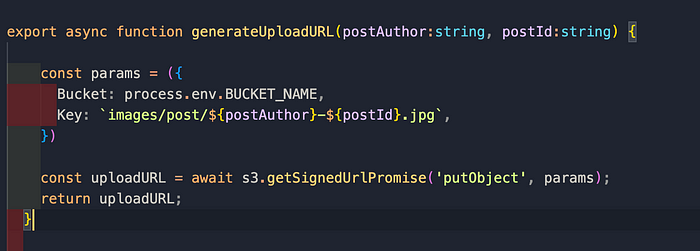
- Therefore, after creating the Chef entity successfully, we generate a unique presigned URL (based on the user's name or unique id) which is then stored in DynamoDB, and immediately retrieved and utilized in a fetch request to POST the image from the form to the S3 bucket.
Now that the image is successfully uploaded to your bucket, all you need to do now is to make a DynamoDB GET request to retrieve the image and populate it on your website.
This is an example of the presigned URL:
https://<<BUCKET-NAME>>.s3.amazonaws.com/BinhNgo-01HC5WMSB02WHFW7DH81TFQ0SJ.jpg?X-Amz-Algorithm=AWS4-HMAC-SHA256&X-Amz-Credential=<<ACCESS- KEY>>%3X092182%2Fregion%2Fs3%2Faws4_request&X-Amz-Date=20231007T201815Z&X-Amz-Expires=900&X-Amz-Signature=1d5cf9f2sdf510d2cafds68a1cda4a31869967e98sdf26es50d6b9f65a9csdf78e5&X-Amz-SignedHeaders=host
As you can see, this is a pretty lengthy URL because it provides all the parameters that are required to have access to the S3 bucket. To retrieve the image, you just need to trim the params out of the URL. You can do this by removing everything after the jpg extension.
   const removeParams = (url:string) => {
      return url.split('?')[0];
    }
Well there you have it! You can now store and retrieve user uploaded images in your S3 bucket and store the image URL in your DynamoDB table for easy fetching. Thanks for reading everybody and I hope it helps! :)